


Here comes the tutorial for the puffy pouch ;)
As I promised, I am introducing two ways to
make this pouch, one made with a 5" flex frame which
may not be very accessible and the other made with
velcro which is fairly easily found at any craft stores.
(The flex frame can be spotted at here,here, and here.)
I love this pouch either way.
This pouch is like the fabric basket tute and
the patchwork drawstring tute combined into one
with a little twist, so yeah, it's quick and easy again!!
I'm keeping my fingers crossed that you'll like it....!!!
As always, seam allowances are 1/4" unless otherwise noted.
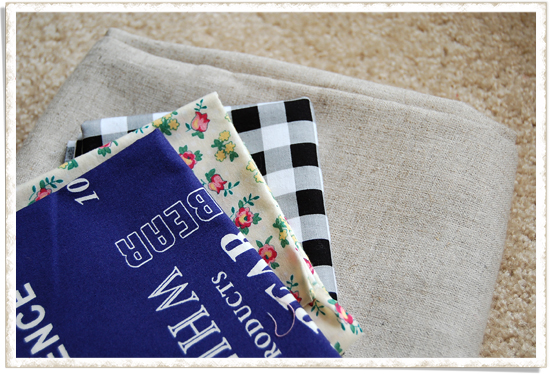
First off, pick out linen (or medium to heavy fabric)
and three different print cotton fabrics that contrast
each other for the external shell.
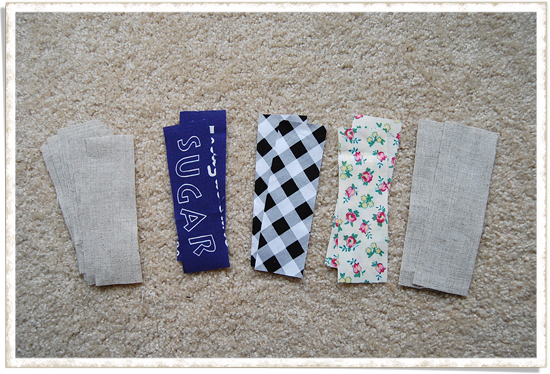
Cut out fabrics into pieces:
Eight 1.75" x 5.5" pieces and
Two 2" x 6" from linen
Two 1.75" x 5.5" from each cotton fabrics.
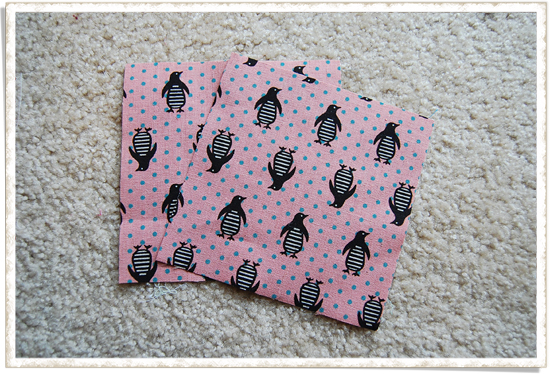
From the fabric for lining, cut out two
5.5" x 5.5" pieces.
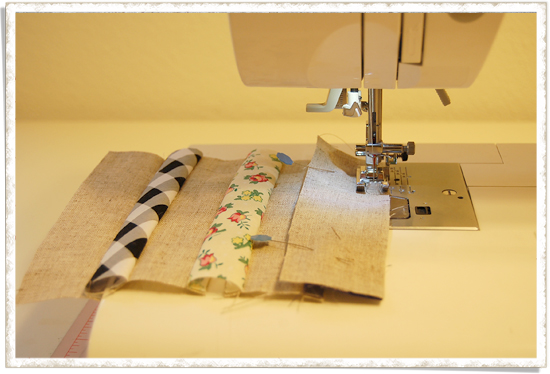
Let's start making the outer shell.
Sew the 1.75" width fabrics like this to make..

Two patchwork panels like these.
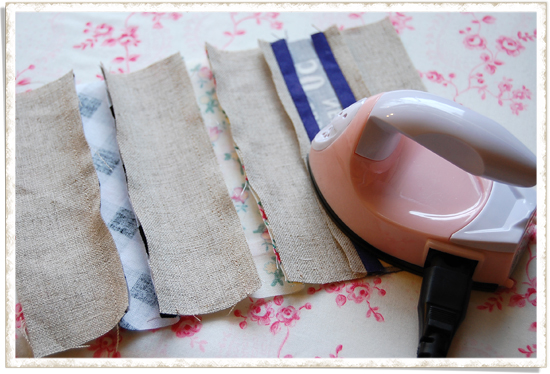
Then press seams open.
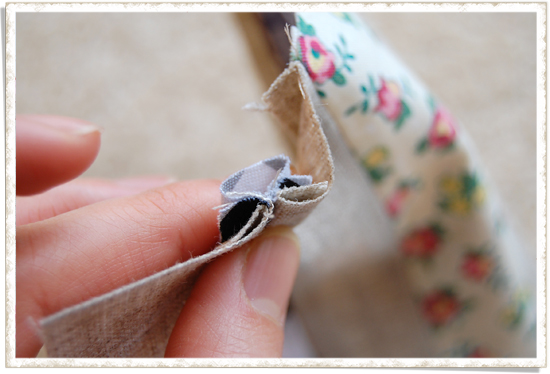
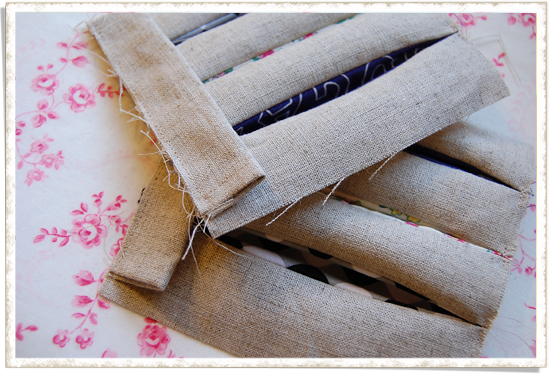
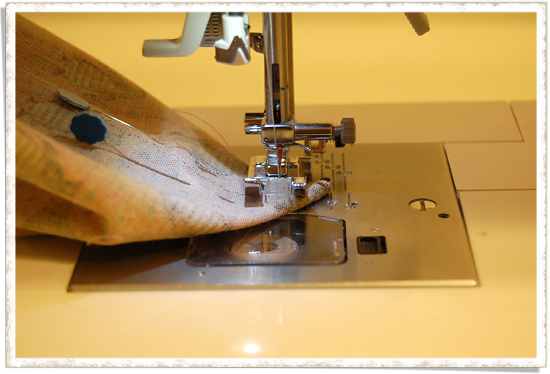
To make a peek-a-boo, grab the cotton fabric
like this at one edge.
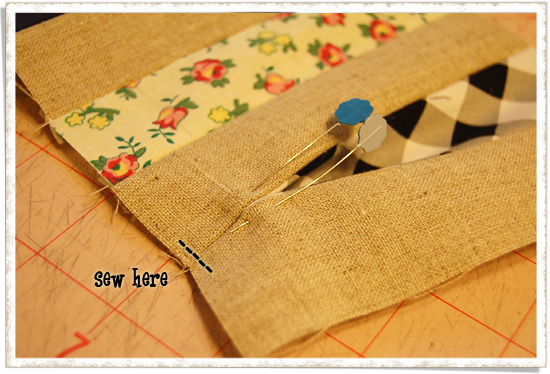
Pin and sew very close to the edge to secure the fold.
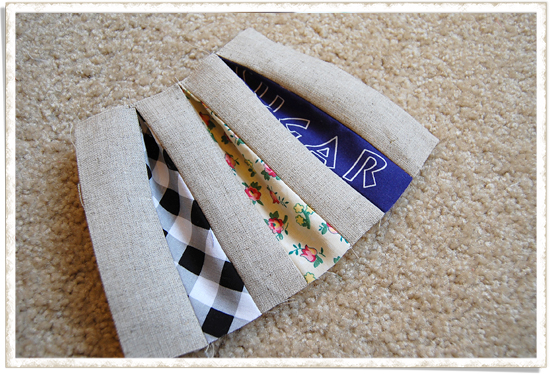
Do that for each short edge of the cotton fabric.
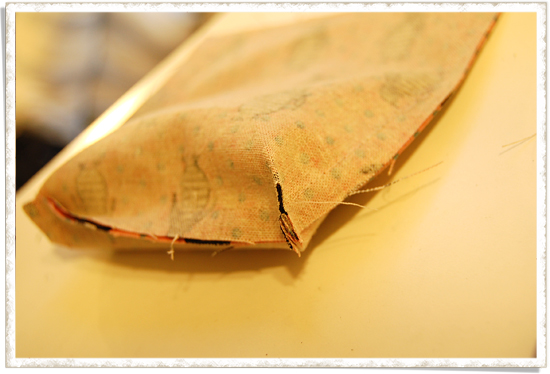
Here is how it looks like after you are done with
three edges on one side, and...
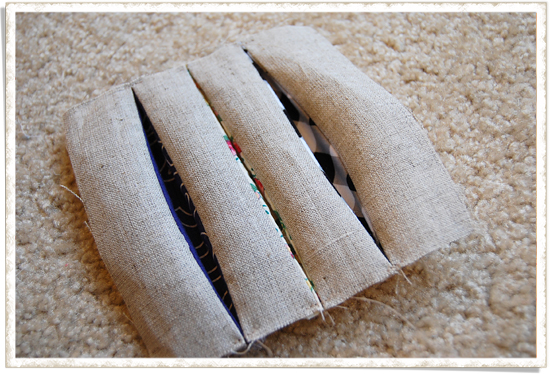
Here is how it looks like when all the edges are sewn up.
Repeat the same process for the other panel.

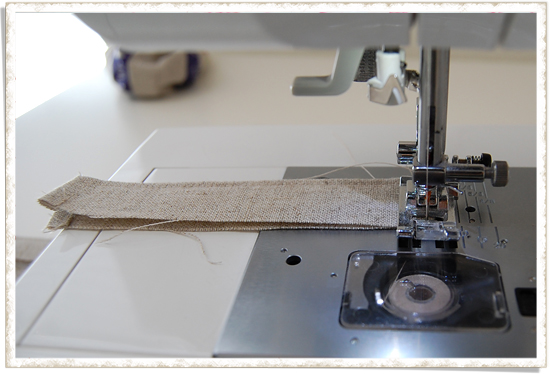
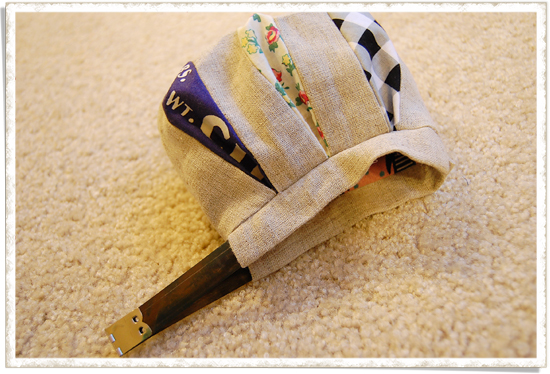
Now let's make the top part of the pouch.
Fold short edges twice, 0.25" and 0.25", of the
two 2" width linen pieces.

Sew very close to the fold line like this.
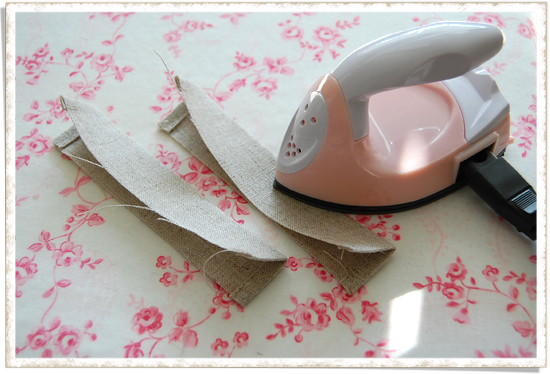
Fold in half and press.
If you are using a flex frame, jump to
the step with this little heart→
If you are using velcro, please
bare with me and follow all the steps ;)
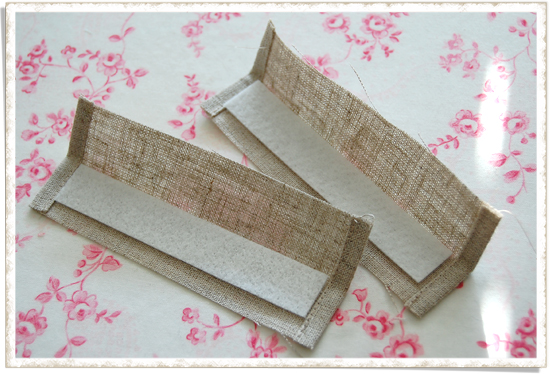
If the pouch is to be made with velcro,
we want to make sure the top part of the pouch
is firm and steady, so we add thick batting.
Cut out batting into two 4 1/2" x 5/8" pieces,
and place each piece in each linen piece,
one long edge aligning the fold line.
(Here, applying fabric glue to one side of the batting
will prevent it from moving when you sew,
which is the next step.)
Sew very close to the edges with wrong sides together...
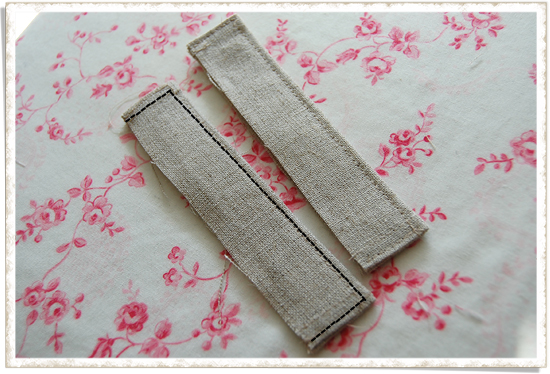
like this so that one long edge is left raw.
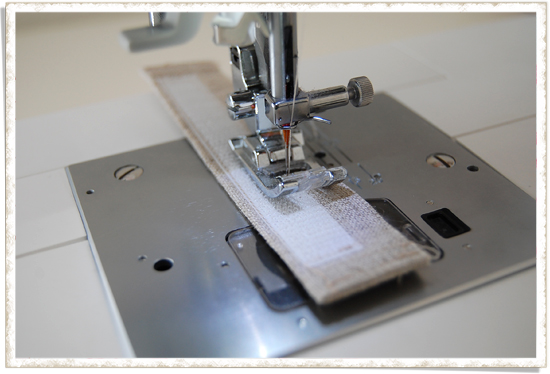
Now, place a strip of velcro measuring 4" x 5/8"
on each of the linen piece, aligning center,
very close to the long folded edge.
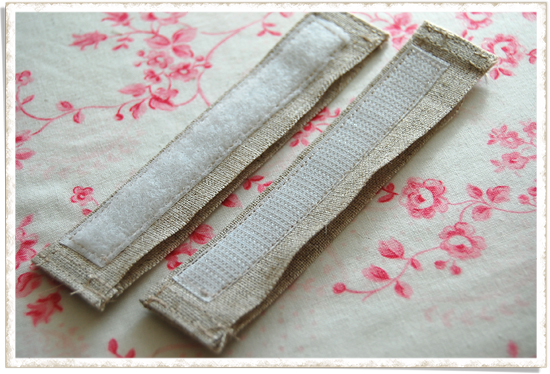
Repeat it for the other piece of linen so that
you have two top parts complement to each other.
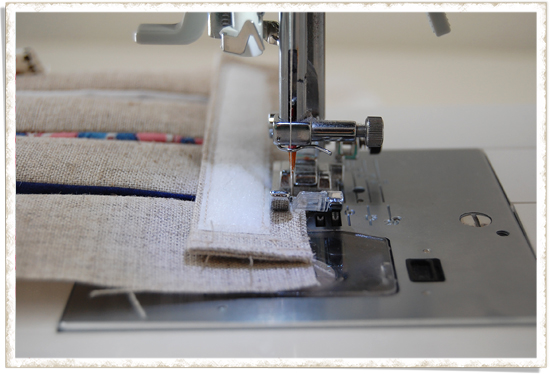
Machine-baste the piece onto the main patchwork
panel, very close to the edges.

Welcome back, the flex-frame takers!
Sew the casing onto the patchwork panel.
So now you have two panels with this thingie attached.
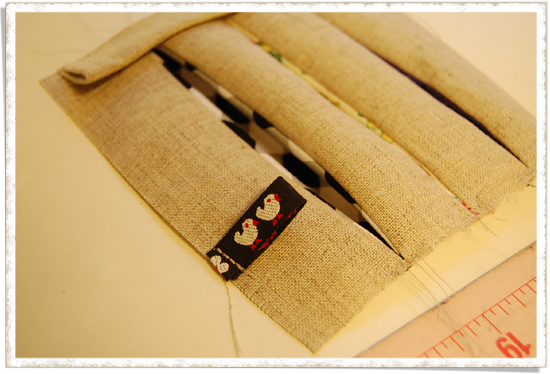
Absolutely optional, but it might be fun to add a little ribbon.

I totally forgot to take a picture of this critical step,
but here we sew the two patchwork panels with
right sides together, all the edges except the top
edge where the casing is attached.
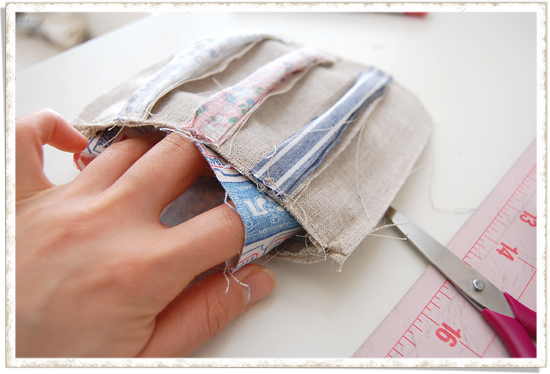
And this is optional, but if you box corner, your
pouch will turn out quite puffy with roundish corners.
(I sewed in the way that from the pointy end to
the needle was about 3/4".) Trim excess at the corners.
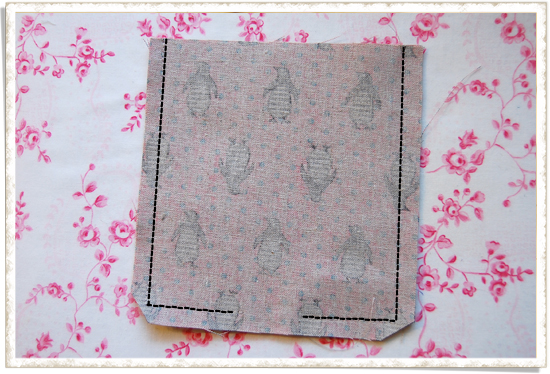
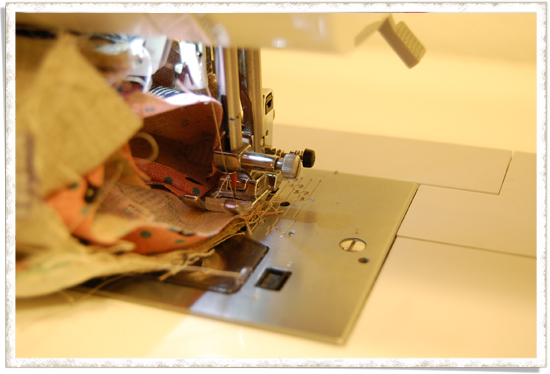
Just like you sewed the outer bag, you are now
making lining by sewing the fabric with right
sides together; this time, make sure to leave
an opening at the bottom.
If you boxed the corners, you may want to
repeat the same process for the lining too.
Then trim excess.
Turn the lining right side out and place it
inside the outer bag so that right sides
are facing each other. (Sorry for the different
fabric for the lining - I was taking photos
while making two pouches with different
fabrics.. I hope I'm not confusing you here..!)
Now sew all the way around the top edge.
Here, the lining and the exterior bag are
sewn right sides together, and the casing is
sandwiched in-between so that when you sew,
you don't see the casing just like the picture above.
This is exactly like the step lining and outer bag
were sewn for the fabric basket and the patchwork bag ;)
Turn the pouch right side out through lining
opening, and hand-stitch opening closed.
If you made it with velcro, you are done! Yay!
If you didn't, then now insert the 5" length
flex frame through casing.
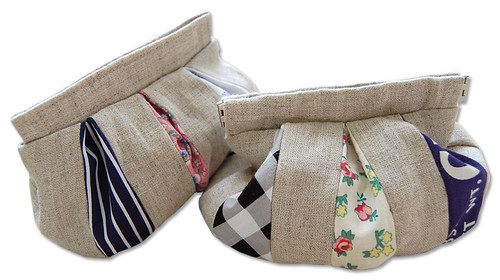
Hooray! Your pouch is finished!!
The left one is made with velcro and the right
one is made with a flex frame. Both of them
turned out really cute and practical ;)
I really hope this tute was easy to follow!
I can't wait to see your pouches in
this flickr pool!! As always,
I would LOVE it if you could let me know what
you think of this tutorial by leaving comments below.
Also as usual, this free tutorial
is only for personal use please.
Thanks for taking your time to stop by!

*FAQs*
Where did you get the cute mini iron?
I got it for my Christmas gift last year!
(How lucky am I?!) I think I've seen the
same iron at Joann but I also found it available
online here.
Where did you get the linen?
I got this ramie linen from this Japanese
online shop, but sadly, they don't seem to ship
internationally :( I think any medium weight
linen would be great for this project though!
Can linen be replaced by denim?
What a nice idea! I'm sure denim would
make a great pouch! I would try it with
light to medium weight denim ;)
Can the flex frame be removed for washing?
Hmmm.. I don't think so unfortunately.
A flex frame is constructed in the way that
once it's put into use, it won't be removed,
so I don't think removing it is very practical :(
Can I use a flex frame of a different size?
Sure you can! I would not go for
one smaller than 4" though, because
it might be a little too small project
to work with. I would also make sure
to adjust the measurements of
fabric pieces to fit nicely.
Can I use metal measuring tape instead
of a flex frame?
What an innovative idea! I've never tried it yet,
but someone made this pouch using metal tape and
told me that it worked really nicely! Let me
share with you what she said;
"You need to round the corners after cutting
to length, and I put masking tape over these ends
as a precaution. When you insert the ruler in the
casing, the numbers face the
(Thank you for letting me know that numbers
need to face inside of the bag to let the pouch open!)
Wouldn't it be better if the lining
also had peek-a-boo parts so that
the pouch is really expandable?
I bet it would be just fine.
I made the lining this way because it's
much simple and quick to make, and I also
thought the pouch might turn out a little bulky
if I made it that way. But I bet it would
work just fine if fabrics you are
using are light-weight cotton ;)
How do you add handles to it?
If I were to add handles to the pouch, I would
use a type of flex frame that comes with a little loops
at the ends just like this one. Those loops are
for you to play with in case you want to add handles.
I've been looking for an online shop that carries
this type of flex frame without much luck.
If anyone finds it somewhere, please let me know
so that I can put the link to the shop here.
Can you make with a zipper?
I'm sure using a zipper instead of flex frame/velcro
will make a really nice puffy pouch too. I would
probably still have the top part of the bag rather
than attaching zipper directly to the main bag.
I would also enlarge the pattern a little just
so that it'd be easy to sew ;)

 |


Thank you for sharing! The puffy pouch is so cute! I love your tutorials, they are easy to follow with lots of great pictures:-)
ReplyDeleteHorray! I've been waiting for this tutorial :) The pouches are soooo cute! Thank you for your time and generousity for sharing all this with us! 早く作ってみたいな~♪
ReplyDeletesuper cute pouches!! many thanks for sharing the tutorial, you´re genius!
ReplyDeleteHappy New Year!!!
Fantastic! Also, where did you get SUCH an adorable little iron??
ReplyDeleteAnother great tutorial from you! Love these cute little pouches... :) I have already ordered a fair share of flex frames to make looottts of them :P
ReplyDeleteOh, and I your iron is adorable! =)
Thanks for the tutorial :)
ReplyDeletethat tiny iron is so cute, I want one!
^_^
Oh, these bags are soooo verry, verry nice!
ReplyDeleteHave a nice day!
Michaela
Great tutorial - this purse is another gorgeous example of your lovely work. Thank you for sharing.
ReplyDeleteI saw this pouch recently here and loved it so thanks for the great tutorial. Lots of pics and clear instructions. Bx
ReplyDeleteAdorable and thanks. Wonder if a person could use those metal tape measures in the casing?
ReplyDeleteThanks so much for this tutorial! I will definitely be making some of these for gifts, as I have done with the patchwork bags. Where do you buy your linen? And, have you tried to make these with denim or is it too heavy? Thanks!
ReplyDeleteWonderful job, I can't wait to try this out! I'll be trying the velcro version first, and then when I get some flex frames I'll try out the other.
ReplyDeleteThank you for sharing this! I love your tutorials! I can't wait to start sewing!
ReplyDeleteVery cute pouches! I can't wait to make one (or ten)! Thanks so much for sharing the tutorial.
ReplyDeleteI LOVE this cue pouch and such a wonderful tutorial! Thanks so much for sharing this! Have a lovely merry happy weekend and love to you!
ReplyDeleteGreat tutorial! Thanks for including two closure options.
ReplyDeleteI absolutely love these adorable little pouches and can't wait to make some! Two questions: Where did you get that iron, I'm so getting one! And, if I use the flex frame, can it be removed for washing the pouch? I never make anything that can't be thrown in the wash!
ReplyDeleteThank you so much!
Darling, just like all your projects! And that little pink iron is entirely too cute! If I ever see one, I just might have to get it for myself!
ReplyDeleteThanks for sharing your creative ideas!
MGM
Oh, these bags are verry, verry nice! Bravo!!!!
ReplyDeleteSo awesome! I was wondering what sort of iron that was as well. . i'm intrigued ;)
ReplyDeleteI used to make pouched but i want wait to ry this one, my make up needs a new one like ... NOW!
ReplyDeleteThis is the cutest project. I love little zakka like this!! Now, going in search of flex frames in Canada....
ReplyDeletethanks so much for another cute tutorial, you're great!
ReplyDeleteIt's so cute!! It's definately going on my list of things to make for myself this year. Oh and I'm loving the iron!!
ReplyDeleteThis is sweet!
ReplyDeleteI think I just fell in love with your iron.
That is a great tute. I would also like to try a slightly bigger version. Thanks so much. I love your little wee iron too!
ReplyDeleteGreat tute.....I love these little bags.... and that Iron.....what can I say..... I LOVE IT......
ReplyDeletePrayers, Bo
oh my! And I saw some little purses at the dollar store with flex frames! I'll have to buy a few to try your very detailed, easy to follow tutorial!
ReplyDeletethanks so much for sharing.
Thank you so much for sharing that pattern and instructions...I think I bought the flex when you first showed this and now I may be able to use them. think I got 4" but we shall see and or buy more.
ReplyDeleteSO cute!! Your style is so distinct. I could look at a picture of this anywhere and know it was a "Pink Penguin original."
ReplyDeleteI blogged about your tutorial on Craft Gossip Sewing: http://sewing.craftgossip.com/tutorial-puffy-pouch-coin-purse-with-flex-frame-or-velcro-closure/2010/01/09/
--Anne
Thank you so much, everyone! I am so glad that you all like the tutorial! To answer the questions you guys asked in the comments, I updated this post with a list of FAQs ;)
ReplyDeleteThanks again for your loveliest comments!!
thanksfor another great tutorial, can't wait to try it! Love your little iron too by the way :)
ReplyDeletei absolutely love this tutorial. it is such a cute little pouch. i have to go find the flex frame somewhere so i can try it.
ReplyDeleteI love the pouch. Have got smaller flex frames, but now I have to get some to fit in with this!
ReplyDeleteCan`t wait to make some. Thank you for sharing. Love your work! Best wishes from northern Norway!
very beautiful project, thanks
ReplyDeleteYeaaa! Thanks for the tutorial...I just have to get some flex frames and I'll be all set! Your tutorials are always wonderful...
ReplyDeleteI loved this tutorial so much, that i already made mine, but i would like to sugest something, that i'm going to try to make for the next pouch, i think the lining should be the same size as the front panels after they are sewed, so that you can use more space inside and the puffy sides will open.
ReplyDeleteOnce more thank you for the tutorial.
Cristina
Thanks for posting the tutorial~now I just need to buy a flex frame :)
ReplyDeleteI think I might just be brave enough to try a flex frame! Thanks for this tute!
ReplyDeleteI just finished using your tutorial and it was so well written... I posted two photos on your flickr group.... (sewingnancyl)...
ReplyDeleteCan't wait to make more. I used velcro...
Wow, this is gorgeous. You have the best tutes! I'll be linking. Thanks soooo much!
ReplyDeleteOh my goodness gracious. This bag is too cute and I'm pretty sure I'll be making one of those tomorrow!! Thanks for sharing!
ReplyDeleteWOW!!!!!!
ReplyDeleteAbsolutely gorgoeus
Love the bag..........mind if i ask?
Is there a way one can add handles to it?
Just curious to know as i always use one with handle.
thanx
Farida
These are fabulous, thanks for the tutorial, I have an old faithful pair of jeans which I know shouldnt be worn any more but cant bear to throw away. This might be the perfect use for them
ReplyDeletePhantastic!!!!! Thank you so much. The pouch is just perfect and your tutorial is too! I was one of your readers who asked you to show us how to make them in a tutorial, so thank you very much for sharing. Greetings from Germany
ReplyDeleteThank you so much for this well explained tutorial....I made something similar with the help of your tutorial and i have blogged about it...
ReplyDeleteI always admire you for perfect tutorials you share with your readers...thank you so much
Excellent and very cute indeed. You've inspired me to give flex frames a go - if I can find anywhere in the UK that sells them.. google here I come ;)
ReplyDeleteThank you sooo much for such a lovely tutorial!
ReplyDeleteThe pouches are just cute and so tempting to make :)
to be honest i want to do this right now..I can´t wait... lovely and useful to use scraps of nice fabrics that refuse to thwow away. I work better reading diagrams, but your tutorial it is fine...thank you very much for sharing this :)
ReplyDeleteThanks so much! I've been waiting for this!
ReplyDeletei would like to try out this tutorial! I'm also planning to do a tutorial on scrunchy or goodies pouch... But i'm not sure how to use photoshop!=P
ReplyDeleteHi!!! I Love love LOOOOOOOOOOOOOOOOOOOOOOVE!!!! your blog, your things are awesome!!!!!!! greetings from MExico!!!!
ReplyDeletethanks for such a detailed tutorial! can't wait to make the pouch :)
ReplyDeletethank you thank you thank you.
ReplyDeletei can make one with velcro. I never even considered that. i am making one. like now. well...ok, i better wait til after work.
thank you for your wonderful tutorials! i just finished a few of your drawstring pouches and i can't wait to try this one.
ReplyDeleteThank you for posting such a wonderful tutorial. All the photos and very detailed descriptions help so much. I just finished making a pouch and it came out so well- because of you! I made mine a little larger than yours, it could be used as a clutch purse for a night out. I'll try to post photos in flickr.
ReplyDeleteCan't wait for your next tutorial, they are all so great.
you are so awesome! thanks so much for this tutorial. last christmas (2008)--i made tons of your little baskets as xmas presents (sorry--i didn't take good pictures)--this little purse might be this year's xmas present! thank you again (and again and again) for taking the time to make these clear and thoughtful tutorials for us!
ReplyDeleteThank you so much! This is great tutorial!!!
ReplyDeleteI loved!!!! Your tutorials are the best! I will make one!!! Congrats, from Brasil, Manuela
ReplyDeleteawesome tutorial, thanks to Kak Zila to share with me. Thanks for your generosity to share Pink Penguin ^ ^
ReplyDeleteI am sure you hear this all the time, but you have great sense when it comes to coordinating fabrics. I always have a tough time choosing fabrics, and I love coming to your blog for inspiration. Thanks!
ReplyDeleteObrigada por disponibilizar um tutorial tão bem feito. Vou tentar fazer. Beijos.
ReplyDeleteEu tambem agradeço o passo a passo or]
ReplyDeletethank you for your wonderful tutorial
but unfortunately did not find in Brazil to buy flex frames
Thanks for this, I love it :) Could you make it with a zip? If so, would you not add the 'thingie' and just sew it to the top of the bag with the lining?
ReplyDeleteHermoso! Muchas gacias por compartir un trabajo tan lindo.
ReplyDeleteThank you so much everyone!
ReplyDeleteChelsea-
I answered your question in the post.
(sorry it took me a while to do that!)
Thank you for the great tutorial!
ReplyDeleteI´d like to show you my first Puffy Pouch. I used denim and patchwork-fabrics:
http://19nullsieben.blogspot.com/2010/01/meine-erste-puffy-pouch.html
Sorry, it´s in german, but I hope you like it! ;)
Thank you! I made one, but had major trouble getting the edges of the casing to come out right- they seem to want to fold inward, and I'm not sure I can visualize how to fix it. Going to rip and try again!
ReplyDeleteI think where I got confused was not knowing how to/whether to press the seam after attaching the casing, and didn't know quite what you meant by "making sure the casing is sewn together (hidden inside)"? Maybe it's clarified in your other tutorials.
Ah! Figured out my trouble. Still not sure what the quoted part means, but after ripping and reexamining my seams versus yours, I figured out that my casing was too long (had folded once at each end instead of twice). Will try again tomorrow!
ReplyDeleteThank everyone! If you make pouches, I would love for you to add your picture to this flickr group!
ReplyDeleteJulieFrick-
I'm very sorry you got confused with the way I explained the step. What I meant was there was to sandwich the top part with the exterior bag and lining so that when you are sewing, it's like the top part hiding since you can't see it at all! Oh wait! hey! you just added your picture in the flickr pool! Oh my goodness you did an AMAZING job making the pouch!! I am so glad to see your pouch!! Sorry I couldn't respond sooner to answer your questions but it looks like you've figured it out on your own.. I'm now going to change the wording a little to clarify what I mean in the tute. Thanks!!
Thankyou so much for a great tutorial with easy to follow directions! I ended up making 3 puffy pouches!
ReplyDeleteThanks for the great tutorial.
ReplyDeleteI made a Pouch yesterday. It turned out cute !
Have a look:
http://geradeausprobiert.blogspot.com/2010/02/pufffy-pouch.html
Thanks
Kerstina
Thanks so much!!
ReplyDeleteI've fun time doing this bag.
And your tutorial is just so great and easy to follow.
Best regard,
Opal
I love this little pouch! I think I'll make it in a much bigger size, and use it for my new diaper bag, and make a matching little change purse. Thanks so much for the great tutorial!
ReplyDeleteObrigada pos disponibilizar o tutorial, adorei e com certeza vou tentar fazer, Beijos
ReplyDeleteJaque Boff - Brasil
wow...great tute...i just made one and it took mere minutes! Great photos and description of each step. I used a natural colored linen blend interspersed with brown dupioni silk....what a cute bag....thank you so much for sharing your genius!
ReplyDeletethank you for sharing this!! its really cute!!
ReplyDeleteIt's so cute! I made one and linked to your tutorial on my blog, www.lizzydesigns.blogspot.com, I hope you don't mind!
ReplyDeleteI am a beginner sewer but thanks to your great way of explaning things and the pictures I can't wait to get started. I am so looking forward to making a few of these. They would be great gifts. Put some make-up and jewellery or even summer pj's in there and I would love to get something like that as a gift. Thanks so much keep up the great work. If you get any other easy things to sew don't hesitate to email me. Thanks again Linda Hill. (hercybaby@yahoo.com)
ReplyDeleteOlá, você permite que eu coloque um link em meu blog para este seu tutorial?
ReplyDeleteThank you so much, everyone!
ReplyDeleteBeth-
Of course! I would love it if you place a link to my tutorial in your blog! Thank you!
I just posted my version of your Puffy Purse on my blog, and I also added it to your Flikr album! It turned out to be a nice evening bag wristlet and I'll probably make a couple more!
ReplyDeleteHi, In Your Q&A Section This Questions was asked:Can I use metal measuring tape instead
ReplyDeleteof a flex frame?
Part of The Reply Was:When you insert the ruler in the casing, the numbers face the outside of the bag.
That is incorrect. The Numbers Must Be Facing the Inside of the bag else it won't click open and closed. Thought you might want to fix it.
(-:
Donna
Thank you so much everyone!
ReplyDeleteDonna-
Thank you for letting me know! I changed the answer a little bit to reflect on your advice. I still haven't had a chance to make a bag using a metal tape so I really appreciate your insight!!
Wow great tutorial! I made one a little bigger for myself. Thanks for the clear explaination and photo's!! http://farm5.static.flickr.com/4058/4414134714_bd08c58f2c_b.jpg
ReplyDeleteOh I put some photo's and your link on my blog!
ReplyDeletehttp://cleolidewij.wordpress.com
thanks for the great tutorial!
ReplyDeletei too made on for myself and posted the pictures to my blog
http://piecefulkwilter.blogspot.com/2010/03/puffy-pouch.html
congrats on your engagement! shannon
i'm going to attempt to make one for my sister, but adjust the sizing to be a bit bigger. hope you don't mind if i link to you on my blog and borrow your end result picture. thanks so much for your marvelous tutorials!
ReplyDeleteThanks everyone!
ReplyDeleteAmy E.-
Of course I would love it if you used the end result picture and linked to here ;)
Here is a GREAT place for LINEN with reasonable shipping. They have linen in many different weights and colors. I buy the "Doggy Bag" remnants which are a great deal for such quality fabric.
ReplyDeletewww.fabrics-store.com
I think you will like this site - I do! Melinda PS - Love this tute! And th eiron!
Hello...me encantó el trabajo...mil gracias por compartirlo...estoy segura que lo haré...
ReplyDeleteUn abrazooote
Hi Ayumills,I tried this tutorial with a 3" flex frame and it works well... i adjusted the sizes of the strip of fabric a little bit to fit... and yes, your tutorial is good.
ReplyDeleteThanks as always!!
jean fr SG.
Thanks everyone!
ReplyDeleteMelinda Hunter-
Thanks for sharing the great shop! The shop has one of the biggest linen selection and the prices are so reasonable!! I must get some linen from there!!
jean-
Thanks for letting me know that you could make one with a 3" flex frame! Now I want to try!!
sew beautiful.
ReplyDeleteThank you for this tutorial! I made this pouch a few weeks ago and the only thing I did differently was that I made the lining the same way as the outside so it's fully expandable! Thanks again for this! I plan on making a few more so I can use them instead of lugging around a huge purse when I go out.
ReplyDeleteAfter reading the comments I myself just had to add my three cents (inflation) (-;
ReplyDeleteIt seems many people have a difference about which way to put the metal tape measure for closure in a bag. So I bought two different patterns and lo and behold the two patters gave different directions. One put the numbers facing the inside, one put the numbers facing outside. I decided the only way to find out is to make them both ways. The Answer is...........
It may depend on the size of the bag but I double up on the tape when making a larger bag. There may be more difference but the main one I could tell was one way makes noise and one way does not. I have make 6 different sizes testing.
Both ways are right!
Donna Rae
i just found you on whip up not i can't wait to try this fab fab love it :)
ReplyDeletehttp://misstracianderson.blogspot.com/
if you have time!!! :)
Thanks everyone!
ReplyDeleteDonnaRae-
Oh thank you so much for letting me know what you've found by your experiment with the major tape. I wish I had some tape that I could make a pouch with so that I'd know..
Thanks!
this is so beautiful.
ReplyDeleteI love the style of this but would like it larger. I can't find the dimensions of the purse when finished. If I cut the pieces of fabric twice as large and put regular handles on it, do you think that would work?
ReplyDeleteI have just spent several hours browsing all your tutorials - they're fantastic, and so inspirational! I want to make every single one of them, right NOW! Thanks so much for posting them :)
ReplyDeletegorgeous ~ could i super-size it and add handles to make it a bag?
ReplyDeleteThank you so much everyone! I can't wait to see your puffy pouches in the flickr pool!
ReplyDeleteFor those of you planning on making enlarged bags, I say go for it! There are several people who let me know that they enlarged the pattern and made a handbag instead of a little pouch!
Thank you ;)
süper olmuş ,teşekkür.
ReplyDeleteçok güzel anlatılıyor resimlerde.
You could just say I'm an old bag lady cause i love making the different bags, but this is the cutest one I've seen anywhere and I am going to make one at least one before our vacation to Boston the end of the month. thank you for sharing and also for the amazing detailed tuts. Mollye
ReplyDeleteWow... just kind of bumbled happily over your site and I LOVE IT!!
ReplyDeleteThis comment has been removed by the author.
ReplyDeleteIt is so cute that I would try it later.
ReplyDeletesuper cute!!
ReplyDeleteHello!
ReplyDeleteThank you for PAP
Beautiful!
hi,
ReplyDeleteVery nice :) I really like your tutorial. I hope i can make it soon..i think if i change the velcro to magnet button, would it possible?
Thanks..
Thank you, everyone!
ReplyDeletesiouxfairy-
A magnetic snap should work just fine ;) I've seen one made with it and it looked amazing!
What is the actual length and width of the overall product? I wanted to make it a pencil pouch (:
ReplyDeleteWhat is the actual length and width of the overall product? I wanted to make it a pencil pouch (:
ReplyDeleteTori-
ReplyDeleteIt is about 5" x 5". If you want to make it a pencil pouch, maybe you will use a flex frame that is much longer than 5" and adjust dimensions for all the pieces accordingly. :)
Ok thank you so much!
ReplyDeleteThis comment has been removed by the author.
ReplyDeleteWhat would be your suggestion for the measurements of the fabrics if I wanted to make an 8 inch by 3 inch one?
ReplyDeleteTori-
ReplyDeleteEvery piece included in this tutorial has 1/4" seam allowances. If you have that in mind, it might be easy to come up with the measurements for your pencil pouch. Also, since it is a really narrow (3") pouch, I would avoid making pleats to make it simple. Hope this helps :)
I just adore your blog!!! every piece you make is perfect an beautiful :D
ReplyDeleteMexico city
Thanks for the great tutorial. I enlarged it and made a purse. It turned out really cute.
ReplyDeleteThank you for sharing this great tutorial, now I have to make one for christmas present.
ReplyDeleteKarin
This is so awesome! I bet I could get one out tonight for a Xmas present! thanks for the tut!
ReplyDeleteI used your tutorial to add a peek-a-boo pleat to a potholder.
ReplyDeletehttp://www.flickr.com/photos/58702936@N03/5428808289/
Thank-you I just started sewing in jan2011 and am self taught. Your tutorial was very easy to understand.
Muito Obrigada por tanta generosidade!!
ReplyDeleteadorei fazer essa bolsa!!
e com sua explicação ficou tudo mais facil!!
thanks
Hola! me encantan todos los tutoriales que haces!
ReplyDeleteuna pregunta.... donde consigues telas tan bonitas?
saludos
Thank you everyone!
ReplyDeleteAnonymous-
I usually get fabrics from Japanese online shops :)
Great experiment. I got it. I will try it. thanks a lot.
ReplyDeleteMLB2k11
reliance data card in chennai
Remarkable! i keep in mind.. Thanks for sharing.
ReplyDeleteSuperheroes|
Mesothelioma claims|Dubai Daily|
HI, I think that is a great tutorial , thanks for sharing, really want to make it one, but unfortunatelly i'm still not able to use sewing machine to sew it :(. But i'm still happy can find your lovely blog, so many pretty project here. And start now i 'll be your follower :)
ReplyDeleteXoxo :)
Edhini
piyo_cutee@yahoo.com
I agree with your point, please share with us more good articles.1985 Mitsubishi Starion AC Compressor
ReplyDeleteThese are AMAZING! I love that you gave a tutorial, too!
ReplyDeletemuchas gracias por el tutorial de la bolsa hinchada, visite este blog por recomendación de Labores en línea, felicitaciones muy lindo todo, un abrazo desde muy lejos..... Cali-Colombia, Nelly
ReplyDeleteThank you so much for this tutorial. I made two yesterday. The pictures of the first one is on my blog, with a link to the tutorial.
ReplyDelete~j.b.
Really beautiful. Thanks for the tutorial. I will try it.
ReplyDeletethanks for the awesome tute, Ayumi! I just received some flex frames in a swap so I think I'll try it xo amy
ReplyDeleteHI! I cannot wait to pick up some velcro so I can try this! Super cute bag (I found it on Pinterest!)! Will now be following you!
ReplyDeleteComing over from http://chasing2monkeys.blogspot.com
I have never looked for flex frame, is it something I can find at Micheal's?
ReplyDeleteGreat tutorial! Many thanks for sharing!
ReplyDeleteI love this! Just one question though, my outer piece turned out waaayy bigger than my lining pieces and I had to cut the sides. Should that be happening? Also, how small is it supposed to be? :/
ReplyDeleteThank you everyone!
ReplyDeleteHumairah-
I haven't had anyone having the problem before. The lining's top width and the outer bag's top width should be about the same length when you sew them together. It should be about 5" x 5" when it's finished. I hope you will be able to finish yours fine! Let me know if there is anything else I can help you with!
Thanks! I don't know where I went wrong :/ but i took a bigger lining the second time. One question though, mine doesn't puff up as much... why do you think that is? I used a heavier fabric for the top strips....
ReplyDeleteHi Humairah,
ReplyDeleteIt may be because you used heavy fabric for the main part of the pouch?
Hi . .
ReplyDeleteI love your tutorial . . that is a very nice for
handmade lover
Big thanks again and again ^_^
Love love love this!!! I can't wait to try and make one of these. Your stuff is amazing.
ReplyDeleteOkay, so do you think if I used the same type of fabric for both strips, it would puff up? OH MY GOD I'LL TRY IT RIGHT NOW.
ReplyDeleteHumairah-
ReplyDeleteIt should puff up if you used lighter fabrics.
I love it and made one today - so cute! It is on my blog if you would like to see it. www.tdab82.blogspot.com
ReplyDeleteThanks so much for posting the tutorial!!
That's very cool, it's like a quilt, but a pouch!
ReplyDeleteThis is very pretty!! Thank you for sharing the tutorial.
ReplyDelete...I also think the iron is super cute!
beats by dre pro
ReplyDeletebeats by dre studio
http://beatspromotionsoldes.info/
I made this bag for myself! Very cool bag!!!!!I inspired on your craft work. Thanks.........
ReplyDeleteI love your ideas! Especially this one!
ReplyDeleteI Already made some of these puffy pouches. If you want to, take a look: http://ein-sternchen.blogspot.de/2012/09/puffy-pouch.html
Thanks for the tutorial :).
Hugs, Christina
Ayumills..
ReplyDeleteVery good tutorials.
from http://weracraft.blogspot.com
So very wonderful. Will definitely try it out.
ReplyDeleteI am absolutely amazed at how terrific the stuff is on this site. I have saved this webpage and I truly intend on visiting the site in the upcoming days. Keep up the excellent work!
ReplyDeleteAdvertising agencies in Pakistan
Advertising
nice tutorials........ thank you...
ReplyDeleteGracias por el tutorial, está muy bien explicado, muchas gracias !!!!!!!!
ReplyDeleteThanks so much for sharing your pattern, very cute design.
ReplyDeleteThis is brilliant!
ReplyDeleteTi ho scoperto solo oggi, il tuo tutorial sul tuo astuccio è bellissimo, grazie per averlo condiviso!!!
ReplyDeleteHello,
ReplyDeleteI am from Poland. I really like your pufy pouch. I would like to sew these and sell them in Poland.
I would be grateful for the information: is it possiblle to buy your project and how much would it cost?
Thank you very much. My email adress: aurela100@op.pl
Best regards,
Aurela Kubisiak
On Sunday, July 27, 2014 7:29 PM, Aurela Kubisiak wrote:
I just found your website. I love this puffy pouch. My husband passed away almost 2 years ago and he had several pocket handkerchiefs and I was looking for something to make out of them. This looks perfect, however I am a novice sewer. I will have to practice before using his scarves. Love your site.
ReplyDeleteThank you, I have recently been searching for information about this topic for a while and yours is the best I've found out so far. But, what concerning the conclusion? Are you positive in regards to the source?
ReplyDeleteharga body slim herbal
I've just finished making this cute little purse for a friend. My frame was just 3" so I had to adjust the measurements, but that was easy. This is the cutest little purse ever. Thanks for sharing the tutorial.
ReplyDeleteThis comment has been removed by the author.
ReplyDelete